How to Jack Up Your Car Safely (and Where the Jacking Points Really Are)
By Colby · How-to · July 11, 2026 · 6 min read
From the garage
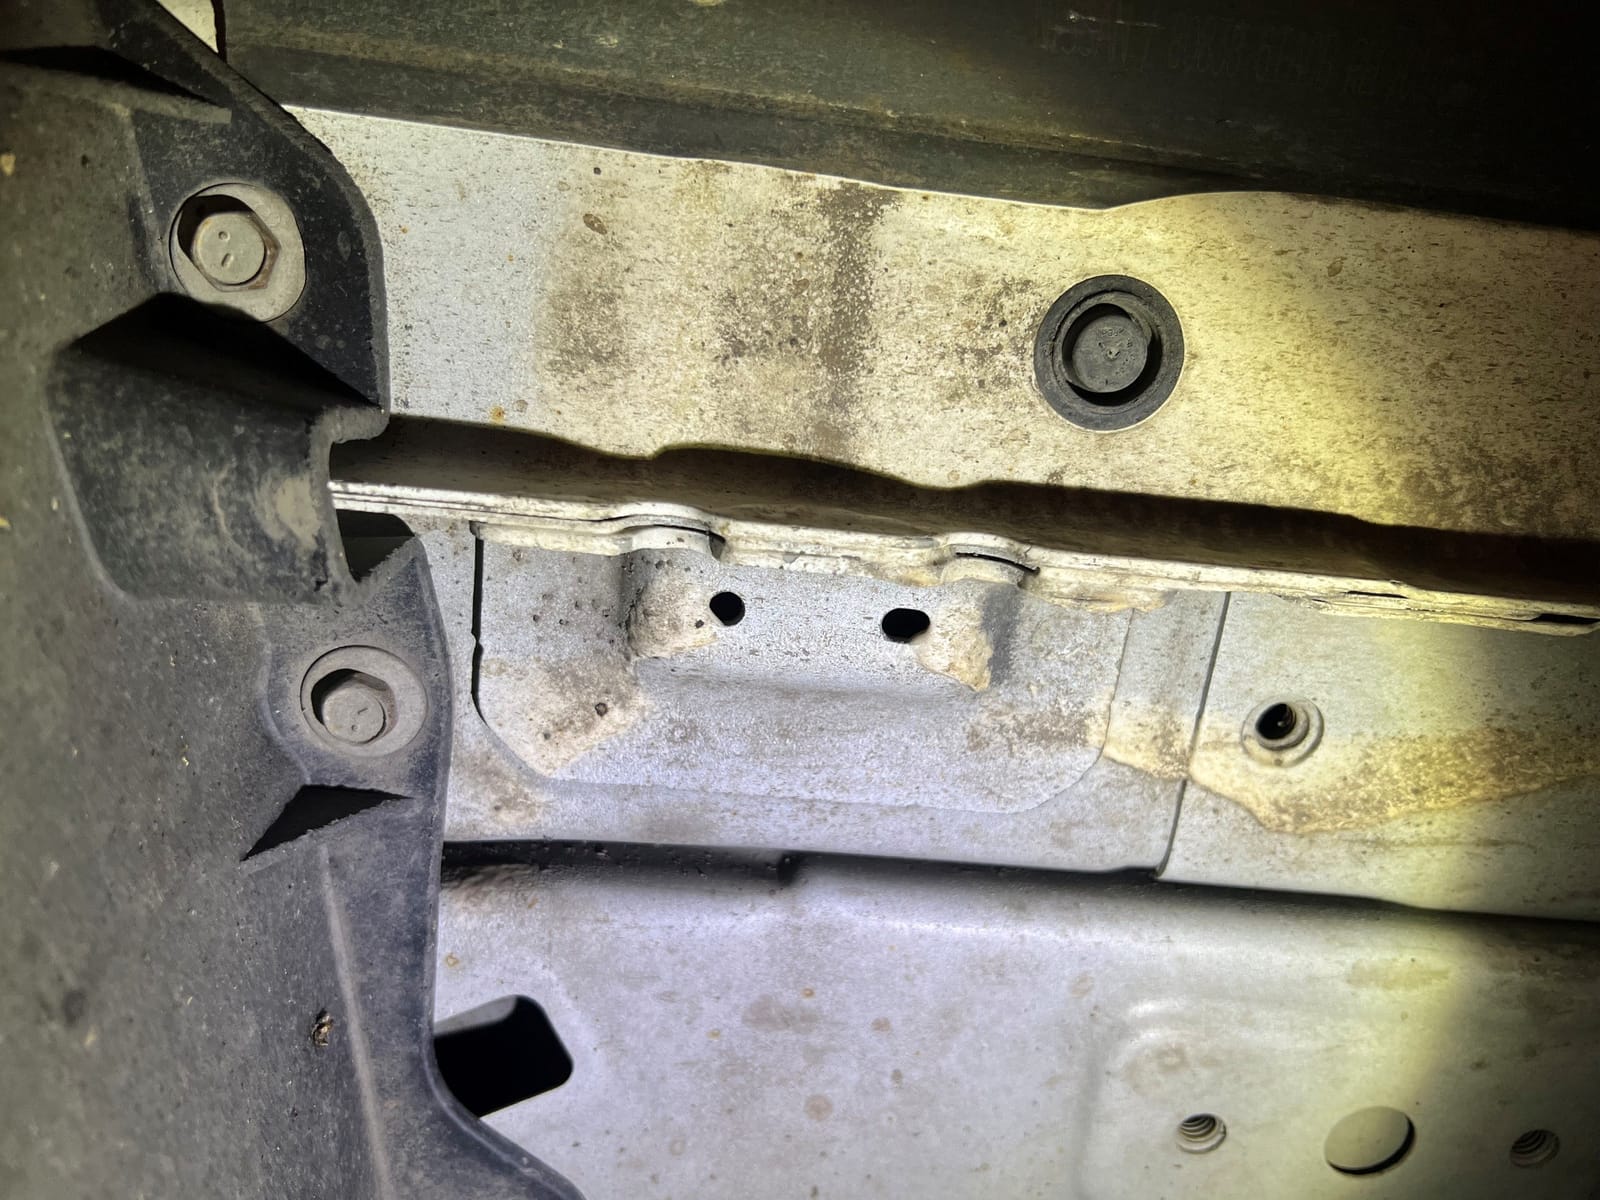
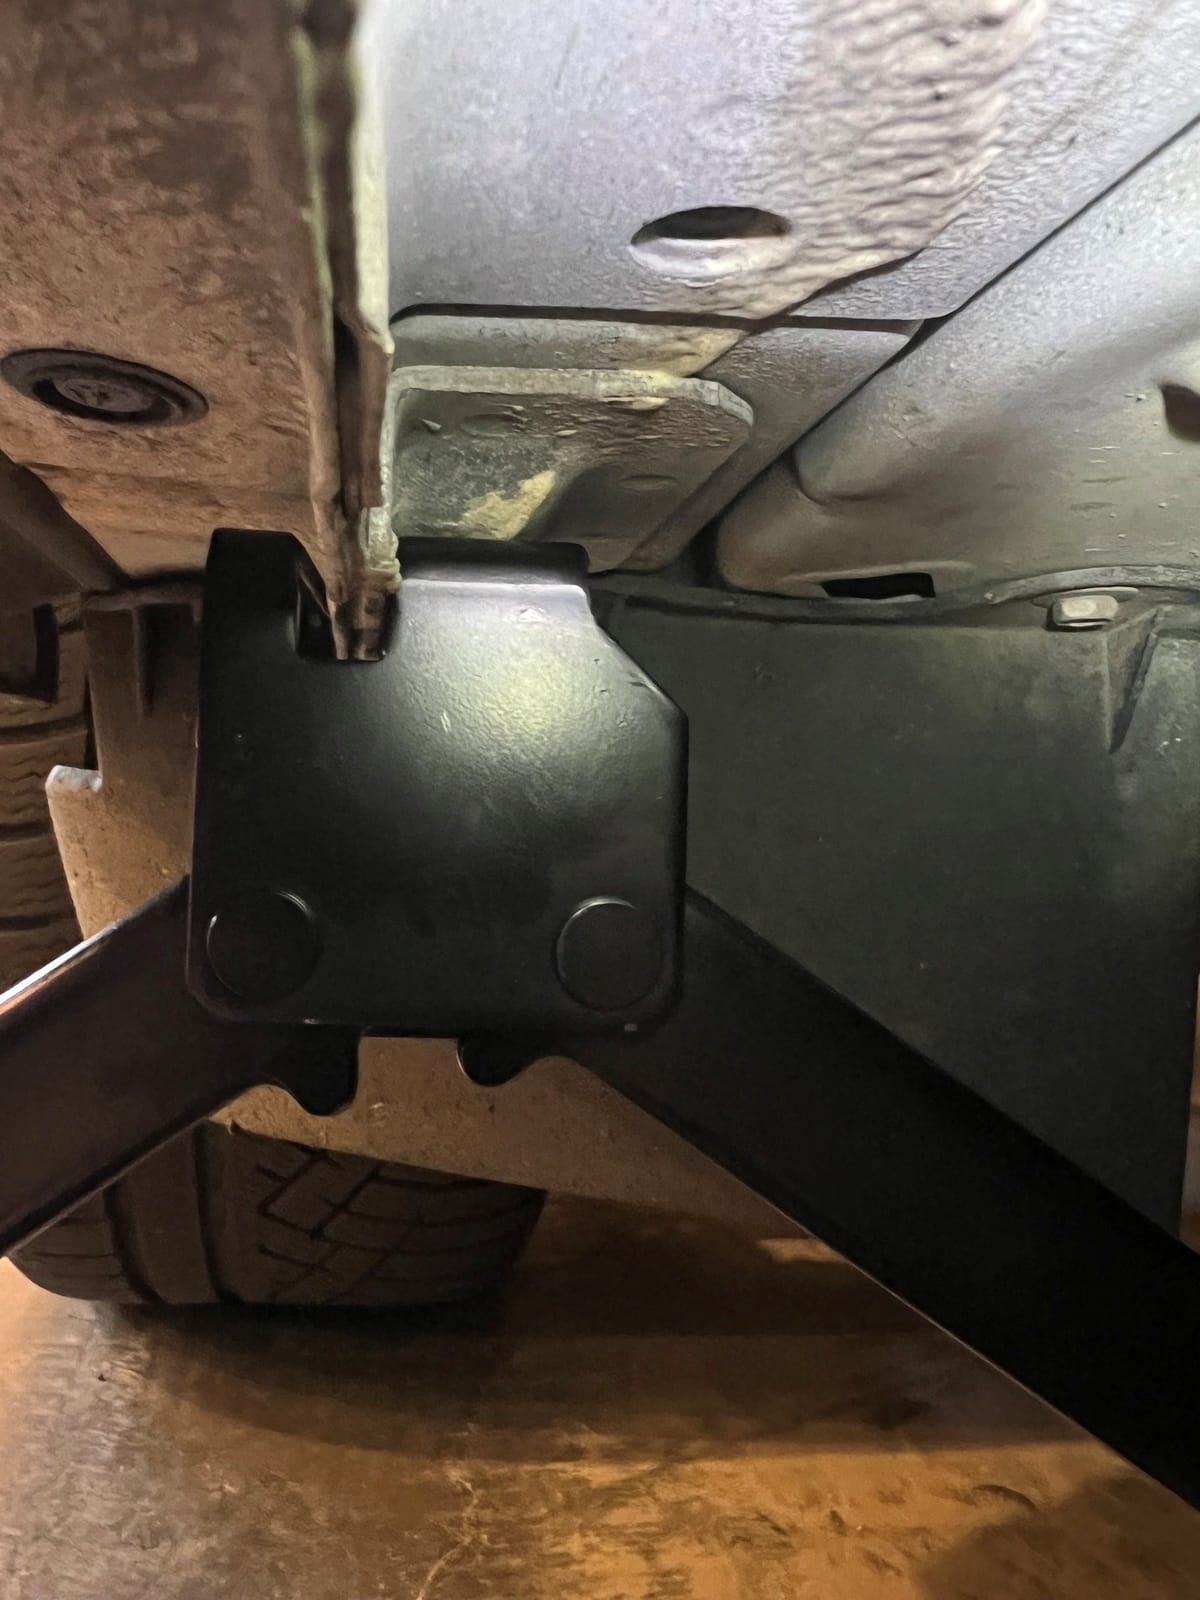
There's a ton of conflicting information out there about where to jack up a car and what the pinch welds are actually for. A lot of people assume there's a special "extra" pinch weld at the jacking point — and sometimes there is — but that's not really the point. Behind that pinch weld, the manufacturer puts a reinforced pad. When the factory jack locates on the pinch weld between the two notches, it lines the jack's pad up with the vehicle's actual structural jacking point. That matters, because if you throw a floor jack with a flat plate under there, you'll very likely crush the pinch weld — it was never meant to be load-bearing on its own. To use a floor jack (or jack stands) on the pinch weld safely, you need an adapter made for exactly that. I kept seeing people get this wrong — and bend their rockers doing it — so here's how I do it.
What a pinch weld actually is
The pinch weld is the seam where two body panels are welded together along the bottom edge of the rocker panel — that thin vertical "fin" running along the underside of the car, just inboard of the doors. On its own, that thin seam is not designed to carry the weight of the car edge-on.
Why the factory uses it anyway — the pad behind it
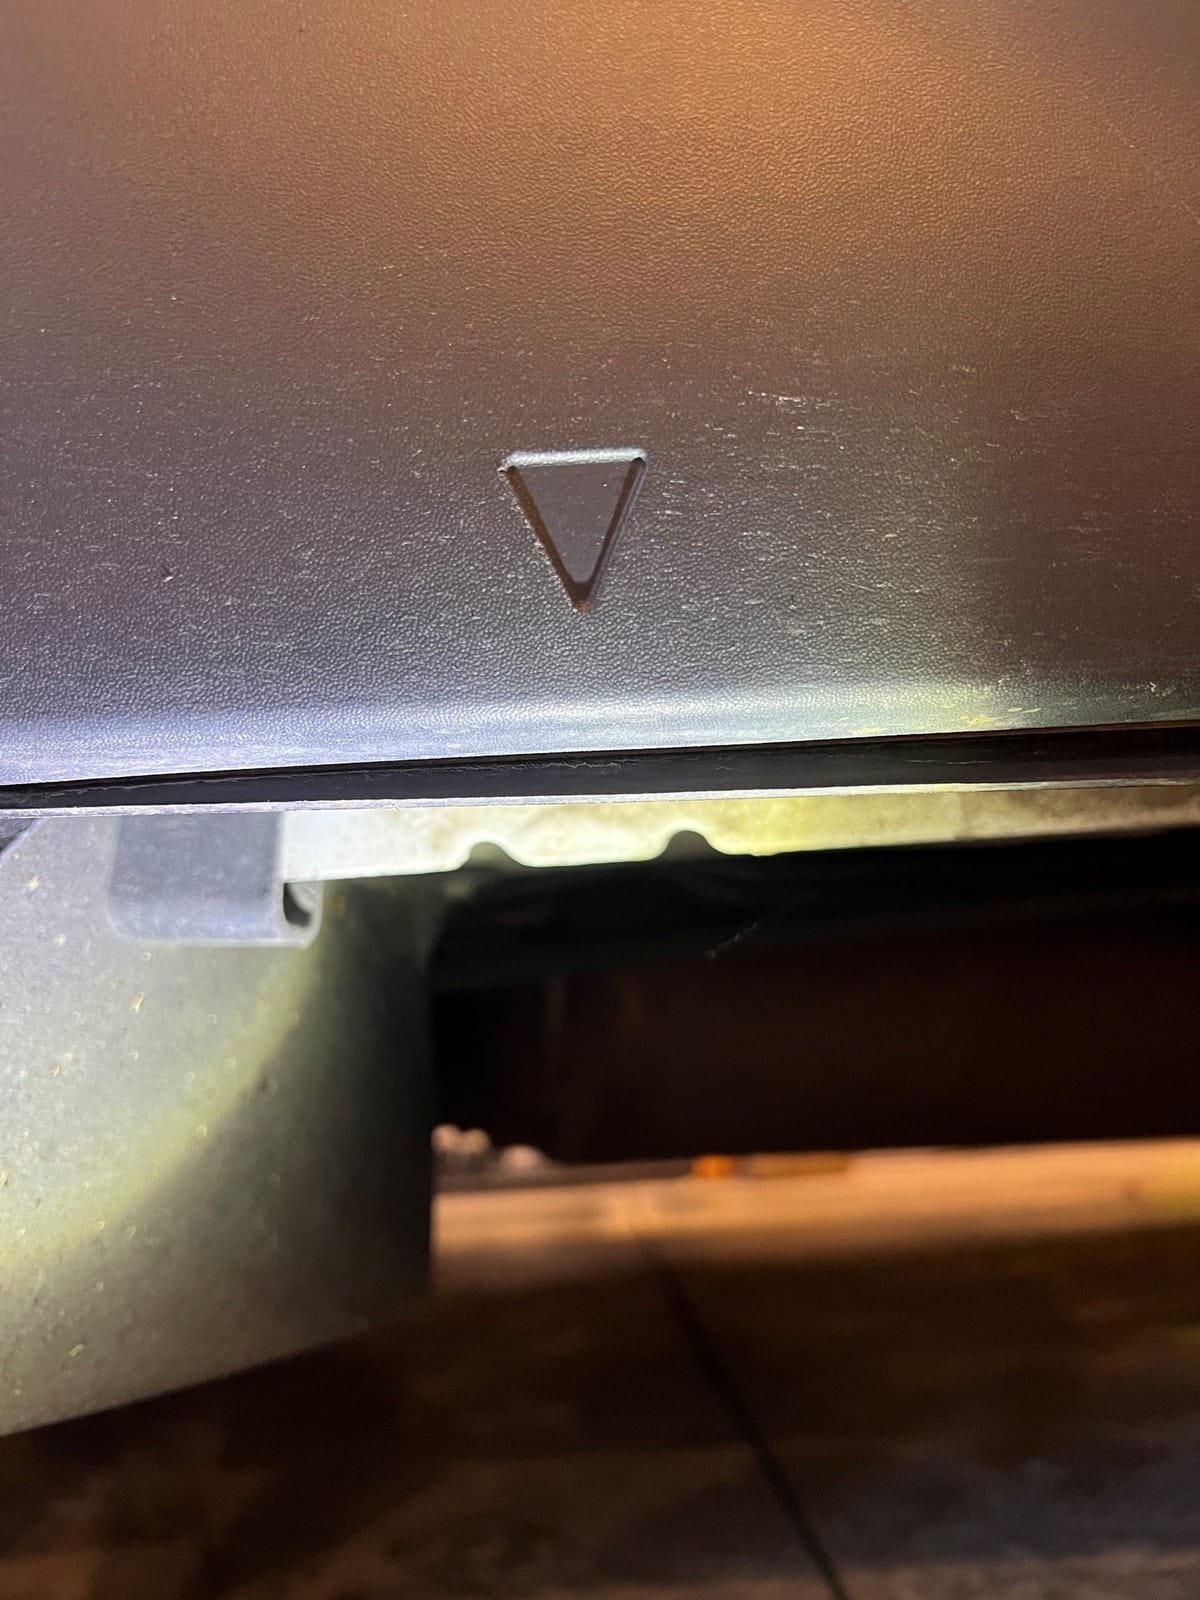
At the designated jacking points, the manufacturer reinforces the pinch weld with a pad or plate behind it, and marks the spot — usually with two notches, an arrow or triangle stamp, or a molded cutout in the plastic side cladding. The factory scissor jack has a slotted head that cradles the pinch weld between those notches, putting the load directly in line with that reinforced structural point.
That's the whole design: jack on the seam, but only where it's backed by the pad, and only with something that cradles it instead of crushing it.
Where the jacking points are
- Four points along the pinch weld / rocker, one per corner — but tucked in from each wheel: the front points sit just behind the front wheels, and the rear points just in front of the rear wheels.
- Look for the two notches, a triangle/arrow stamp, or a cutout in the side skirt to mark the exact spot.
- Some cars also have a central point at each end (a front subframe/crossmember or a rear subframe) for lifting a whole axle at once — but the pinch-weld points are your per-corner locations.
- Your owner's manual has the exact spots — it's always the final word, especially on newer unibody cars where cladding hides the marks.
Why a flat floor-jack plate is a problem
A floor jack's saddle is a flat (or shallow-cupped) steel plate. Put that flat under a thin pinch weld and the entire load rides on that knife edge — it folds or crushes the weld, tears the seam sealer, and opens the door to rust. The factory scissor jack gets away with it because its head is slotted to straddle the weld. A flat plate isn't — so it needs help.
The factory scissor jack is for emergencies only
And don't lean on that scissor jack for your regular work either. The jack that comes with the car is a roadside tool — it's there to change a flat on the shoulder and get you moving again, and that's it. It's slow, narrow-based and tippy, and it simply isn't built to stand up to regular maintenance use. For anything you'll do more than once, get a proper floor jack (or an air jack, like the one I use below) that's rated for the weight and made for repeated lifting. Leave the scissor jack in the trunk where it belongs.
The fix: pinch-weld (jack pad) adapters
This is the tool most people are missing. A pinch-weld adapter is a slotted rubber or urethane puck that sits on your floor jack's saddle — and on your jack stands. The slot cradles the pinch weld so the load spreads across the reinforced pad instead of crushing the thin fin. They're cheap, and they turn the factory jacking point into something you can safely use with shop equipment.
The tools I use to jack a car safely
My tried-and-true picks. BoxKitz earns a small commission on purchases through these links, at no extra cost to you — see our affiliate disclosure.
VEVOR 3-Ton Triple-Bag Air Jack
What I useThis is what I reach for. It runs off your shop compressor and lifts a corner — or a whole end — in a few seconds, no pumping. The triple-bag design gets a good height fast. Just pair it with the adapters below so it sits on the pinch weld, not on the flat.
View on Amazon →Toolly Jack Pad Adapters (4-pack)
The missing pieceThe piece most people are missing. Slotted rubber pucks that cradle the pinch weld so your jack and stands don't crush it. The 4-pack gives you one for each corner — cheap insurance for your rockers.
View on Amazon →Jack stands (rated pair)
Must-haveNon-negotiable. A jack lifts; stands hold. Get a rated pair — 3-ton is plenty for most cars — and set them under the same points (with an adapter) every single time.
View on Amazon →PR1ME Wheel Chocks (2-pack)
A couple of chocks stop the car from rolling while it's up. Bright, grippy base, a few bucks — no reason to skip them.
View on Amazon →Always use jack stands — every time
A hydraulic jack is for lifting, not for holding. Once the car is up, put jack stands under a solid point — the same pinch-weld points (with adapters) or the manufacturer's designated stand points — lower the car onto them, and give it a firm shake before any part of you goes underneath. A hydraulic seal can fail; a properly placed stand won't.
Step by step, the way I do it
- Flat, solid ground — concrete, not gravel or a slope. Engine off, in Park (or in gear for a manual), parking brake on.
- Chock the wheels that stay on the ground, diagonally opposite the corner you're lifting.
- If you're pulling a wheel, crack the lug nuts loose before you lift — just a fraction of a turn.
- Set your adapter on the jack saddle, roll the jack under the pinch-weld point, and lift slowly, watching that the adapter stays seated on the weld.
- Slide a jack stand (with adapter) under the point, lower the car onto the stand, and confirm it's solid.
- Shake test. Then — and only then — get to work.
The bottom line
Jack on the pinch weld, but only at the reinforced point between the notches, and only with an adapter that cradles it. Skip the adapter and a flat floor-jack plate will crush the very point that's meant to hold your car up — and never trust the jack alone. That's what stands are for.
Guides are general advice for typical vehicles — your owner's manual is the final word for your specific car, especially on jacking points and torque specs. Work safely.
Frequently asked questions
How do I get jack stands under the same points I jacked the car up from?
You can't fit the jack and a stand in the same pinch-weld point at once, so lift from a central point instead. Most cars have a central jack point at each end — a front subframe or crossmember, and a rear subframe (check your manual) — that raises the whole end at once. Lift there, put a stand (with an adapter) under each corner's pinch-weld point, and lower the car onto the stands. No central point, or only doing one corner? Keep the load on the jack and slide a stand under a rated point nearby as a backup catch — the subframe or the manufacturer's stand location, not just 'anywhere solid' — and lay the removed wheel flat under the car as a second fail-safe. Never get under a car held by the jack alone.
Can I use a floor jack on the pinch weld?
Yes — but only with a slotted pinch-weld adapter on the jack saddle. A bare flat floor-jack plate puts all the load on the thin seam and will crush or fold it. The adapter cradles the weld so the load spreads across the reinforced pad behind it.
Is it safe to work under a car on just a jack?
No. A hydraulic jack is for lifting, not holding — a seal can let go without warning. Always lower the car onto jack stands at a solid, rated point and give it a firm shake before any part of you goes underneath.
Where are the jacking points on my car?
Along the pinch weld, one per corner, tucked in from each wheel — the front points sit just behind the front wheels and the rear points just in front of the rear wheels. Look for two notches, a triangle or arrow stamp, or a cut-out in the side cladding. Your owner's manual shows the exact spots.
Colby
Colby is the founder of BoxKitz and a lifelong driveway mechanic. He does his own maintenance across the family's vehicles and writes these guides from the garage floor, not a spec sheet.